Wednesday, February 3, 2010

silhouettes

I finished the silhouettes of my kids and wanted to share the final result. These are done on painted 12" canvases. I cut ebony vinyl. Using the gypsy I welded hair from the Paper Doll dress-up cartridge to the faces from the A Child's Year cartridge. I love them!

Thursday, November 5, 2009

Advent calendar


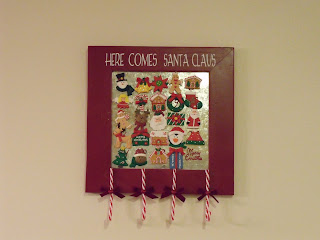
This is the first project I made using my Gypsy. The magnet board was painted red. Then I cut the numbers in a 5x5 grid from cherry red vinyl and added the Merry Christmas for the last day. I cut the Here comes Santa Claus from white vinyl and added it to the top of the board.
The candy canes were hot glued upside down to use to hold the ornaments. I hot glued magnets to the back of the ornaments so they can adhere to the magnet board.
Candy canes and ornaments were all purchased at the dollar tree.
I am now ready to count down the days until Christmas!

Tuesday, November 3, 2009

Gypsy by Cricut


My gypsy arrived yesterday!
Can I just tell you how excited I am to have this! From the moment I heard about this months before it was announced to the public I knew it was a must have.

From the moment I opened the box yesterday I have been reading the user manual, linking cartridges, creating titles and playing with this awesome tool. I have not been disappointed!

My only complaint is that I think Provo Craft needs to cop up and include a user guide with this $299 electronic device. Really for how much you pay can't they throw in a few sheets of paper? You do get a small sheet showing how to turn on the gypsy. That's it. For the rest of it you are on your own.
Ok so on the good things. I love being able to search my cartridges for any image! I love not having to have 58 boxes to look through.

I can't wait to do more projects. I will be sure to upload them when they are done!

Sunday, November 1, 2009

Flower clips


I have been home sick for over a week now and have been able to sit and do a few projects.


My sister and I got together and made 140 of these flower clips! Aren't they cute!


The large ones are about 4" across. The smaller ones we made in sets of 2. They are about 2" across. These are fun to put on headbands or hats! I think I may keep a couple to wear with my scarves.


I used the Imaginisce build a blossom sets in winter, summer and fall. I used all the large flowers in each back and maybe half of the medium and small ones. I have so many flowers left! These packages are great!
To make the centers I used scraps of fabric to make brads using the Imaginisce I-top tool. It was great to be able to make them to match. LOVE this tool!


Once assembled clips were hot glued to the back. And they are done!

I now have enough clips for birthday and baby gifts for the next year!!!

Bangle watches

I made a few of these with my sister a while ago and decided they would make great gifts for my 3 girls. Shhh, don't tell them. It is a surprise!

I love the way they turned out and think they will like them.

These are so easy to make. You need a watch face with a bar on it to attach the bracelets. You need beads, stretchy plastic string and clasps. Walmart carries a great selection of beads. I even bought a few sets of bracelets in the jewelry department and took them apart.


Benches


It only took 2 months to finish the benches!

First let me say I don't do power tools so I had to depend on my husband. And did I mention he doesn't do power tools either! Yeah this was a fun experiment as we are not handy people.

First we had to make a plan. I wanted sturdy benches out of 2x4's. Then we had to go to Home Depot to get the wood. Our math skills were tested as we were making 4 benches which meant 12 pieces for the tops, 8 legs, braces and then stain for the wood.

After several hours we had our wood all cut.

Then it was time to stain the wood. What a project! We had to do 2 layers on each side waiting 24 hours between coats and then a week between each side as the weather was cool the stain was not drying very quickly. I highly recommend doing a project like this in warmer weather.


Once the pieces were stained my hubby pre-drilled the holes.

Finally it was time to assemble. We built the legs first and then laid out the tops and screwed the legs to the top. Braces were added and we were done!

The benches are sturdy and will work great. I am not thrilled with my stain job but for my first project it works! I love that they are movable so I can use them around a table for large family gatherings.

Monday, August 31, 2009

Room makeover for under $200

1 gallon of red paint - $13
1 curtain rod - $4 (40% off at JoAnns)
2 brass stars - $16 (50% off at Roberts)
4 baskets - $30
4 body pillows - $40
4 sheet of transfer tape - $10
8 yards of denim - $35 (50% off at JoAnns)
14 sheets of vinyl - $40

What do you do with a room with blue carpet and a red rug? An Americana theme of course!


I had never thought I would do an American themed room. It just seemed so overdone. Then I moved in a house with blue carpet.

After being here for 5 months and pondering the decor I decided to do the American theme with a twist. I had just done the older girls room with vinyl and loved the ease and look. The large wall in the basement was just begging for large 12" letters. United we Stand fit the theme and looks great with the kids pictures.


I painted the wall behind the entertainment center red as an accent,


added a blue and yellow star border on the overhang,


found a blue clock from a different room and added the saying Liberty underneath.


My sister helped by sewing the curtain and covering the body pillows in denim. These will become cushions after I make benches next week. I will 2 - 10 make the benches for u


I love the look!

A few tips I learned:

1. when painting red be sure to cover the floor entirely first! (red paint is very hard to get out of light blue carpet)

2. When hanging pictures and you discover your ceiling is not strait just alternate the height of the pictures so you can't tell if anything is not even.

3. To help align vinyl letters straight tape down ribbon or yarn across the wall as a guide.
4. If letters are not perfectly straight add images such as the blue stars to guide your eye across the word and take the focus off the straight part.

5. If you cannot get your connected word straight it is ok to cut part of it and then overlap the cut parts (I did this 2 times on the word Liberty and you cannot tell)

6. Have everything you need before y0u start. It is slightly dissapointing to start the border and get halfway done only to realize at 9:30pm that you will be 2 sheets of vinyl short of being able to finish the blue stars.